

Easy Installation and Pre-built Project for Complain and Request Management System: Perfect for Your College Project
Design Your Next Project with Ease: Complain and Request Management System for College Students


Introduction
Are you a college student looking to create a project that showcases your coding skills? Look no further than the Complain and Request Management System project, available for free on GitHub. This project is written in both C# and VB.NET, making it a great choice for students who are comfortable working in either language.
Overview and Background Information
You can find all the necessary information about the project, including details about its modules and user roles, in the document folder located in the project GitHub repository.
The document folder contains important documents such as project scope, project plan, user requirements, design documents, and user manuals. These documents provide a comprehensive understanding of the project and its components.
To access the document folder, simply navigate to the project GitHub repository and look for the "Documents" folder. Once inside the folder, you will find all the relevant project documents that you can download and review at your convenience.
Prerequisites
Before we dive into the installation process, make sure you have the following tools and software installed on your computer:
Visual Studio 2022: This is the integrated development environment (IDE) used to build and run the project.
.NET Framework: This is a software framework developed by Microsoft that is necessary for running the project.
Installation
Once you have these tools installed, follow these steps to install and run the Complain Management System project:
Download the project files from GitHub. You can find them at
https://github.com/ritik-prog/complain-request-managment-systemClick the green "Code" button and then select "Download ZIP" to download the project files to your computer.
Extract the project files to a folder on your computer. You can do this by right-clicking on the ZIP file and selecting "Extract All".
Open Visual Studio and select "Open a project or solution" from the home screen.
Navigate to the folder where you extracted the project files and select the file "helphub.sln". This will open the project in Visual Studio.
Dependencies Installation
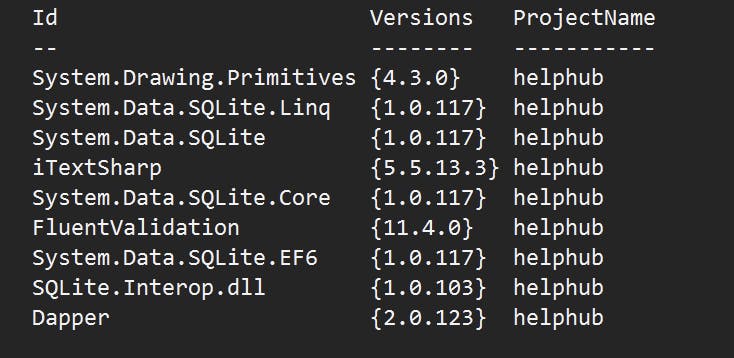
The picture you have listed under Dependencies Installation lists the required packages that need to be installed to run the project successfully. These packages are crucial dependencies that are necessary for the project to function properly.
To install these packages in Visual Basic 2022, follow the below steps:
Open the project in Visual Basic 2022.
Open the "Solution Explorer" pane.
Right-click on the project name and select "Manage NuGet Packages".
In the "NuGet Package Manager" window, click on the "Browse" tab.
Search for the required packages by name in the search bar and select them.
Click on the "Install" button next to each package to install them.
Alternatively, you can install these packages using the Package Manager Console. Follow the below steps to install packages using the Package Manager Console:
Open the project in Visual Basic 2022.
Open the "Tools" menu and select "NuGet Package Manager" > "Package Manager Console".
In the Package Manager Console window, paste the following command to install the required package:
 NuGet\Install-Package System.Drawing.Primitives -Version 4.3.0
 NuGet\Install-Package System.Data.SQLite.Linq -Version 1.0.117
 NuGet\Install-Package System.Data.SQLite -Version 1.0.117
 NuGet\Install-Package System.Data.SQLite.Core -Version 1.0.117
 NuGet\Install-Package System.Data.SQLite.EF6 -Version 1.0.117
 NuGet\Install-Package SQLite.Interop.dll -Version 1.0.103
 NuGet\Install-Package Dapper -Version 2.0.123
 NuGet\Install-Package FluentValidation -Version 11.5.1
 NuGet\Install-Package iTextSharp -Version 5.5.13.3
Press Enter to execute the command.
Please ensure that all the necessary dependencies have been installed and integrated with the project. To do so, follow the below steps:
Open the project in Visual Basic 2022.
Navigate to the "Solution Explorer" pane.
Expand the "References" node to view all the references included in the project.
Check whether all the required references are present and do not have warning or error icons. If any references are missing or have warning or error icons, it indicates that the necessary dependencies have not been installed or have not been integrated with the project correctly.
To resolve any missing dependencies, try reinstalling the corresponding package using the NuGet Package Manager or the Package Manager Console.
It is crucial to cross-check all the dependencies to ensure that the project functions as intended and that there are no errors or issues due to missing or incorrect dependencies.
Setup Database
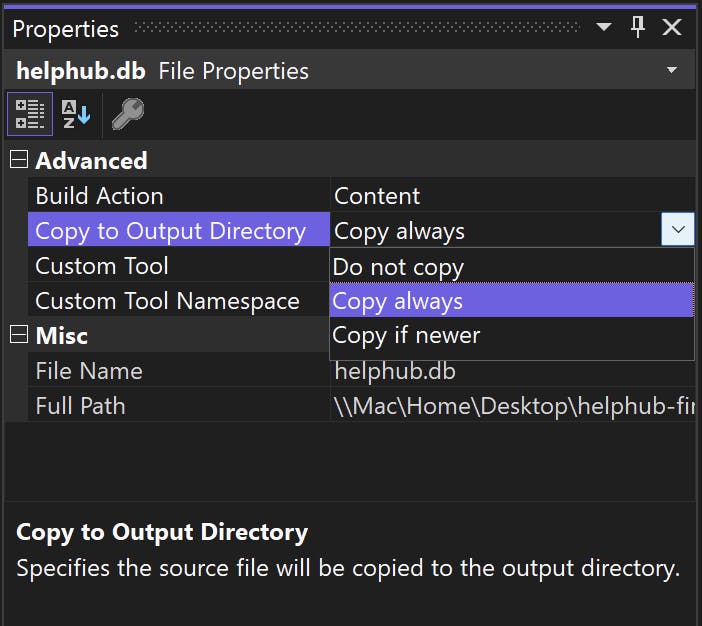
In Visual Studio, right-click on the "helphub.db" file in the Solution Explorer window and select "Properties".

In the Properties window, set the "Copy to Output Directory" property to "Copy always".
Save the changes and build your project.
By setting the "Copy to Output Directory" property, Visual Studio will automatically copy the "helphub.db" file to the bin folder every time you build your project. If this is not happening automatically, You can manually copy the file to the bin folder by following these steps:
Build your project by selecting "Build" from the menu bar and then selecting "Build Solution".
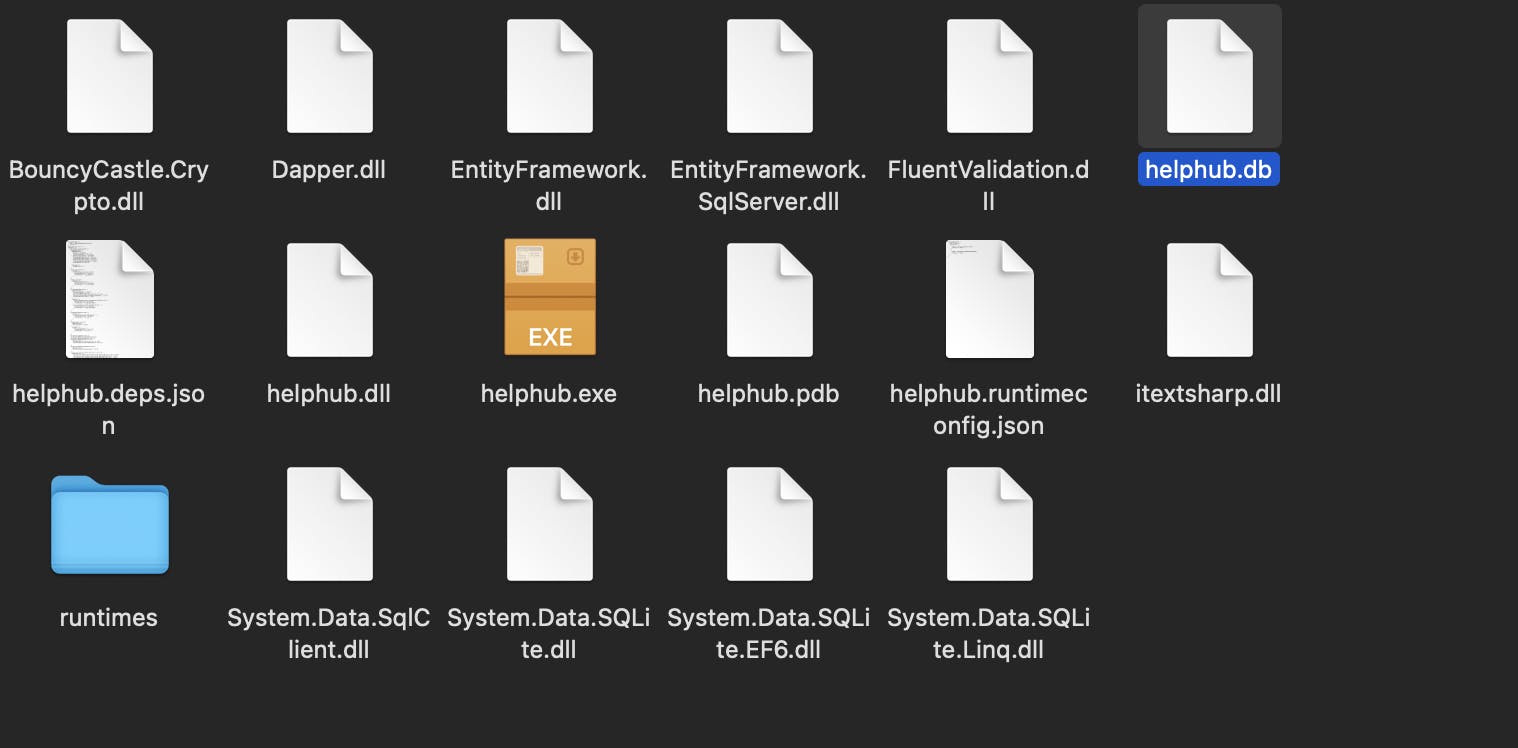
Once the build is complete, navigate to the bin folder in your project directory.
Locate the "helphub.db" file in your project directory and copy it.
Paste the file into the bin folder.
The bin folder is a subdirectory within your project's root directory that contains the executable files and other resources that are generated when you build your project.
By default, the bin folder is located within your project's directory structure. To access the bin folder, navigate to the root directory of your project, then open the "bin" folder. Inside the "bin" folder, you will see subfolders for each configuration of your project (such as Debug and Release). The "helphub.db" file will be copied to the appropriate subfolder based on the configuration you are building.
For example, if you are building the Debug configuration of your project, the "helphub.db" file will be copied to the "Debug" subfolder within the bin folder. Similarly, if you are building the Release configuration, the file will be copied to the "Release" subfolder.
I hope this provides more clarity on the location of the bin folder within your Visual Basic project!
That's it! By following these steps, you can ensure that the "helphub.db" file is always copied to the bin folder of your Visual Basic project.
Setting up Platform Target
How to Switch to x64 Bit Platform Target in Visual Studio and Add it Manually if Required.
To execute the project successfully, it is essential to ensure that the platform target is set to x64 bit in Visual Studio. This step is necessary to avoid any issues or errors that may arise due to differences in platform architectures.
To switch the platform target from any CPU to x64 bit, follow these steps:
Open the project in Visual Studio.
Navigate to the "Solution Explorer" pane.
Right-click on the project name and select "Properties" from the context menu.
In the project properties window, select the "Build" tab.
Under the "Platform Target" section, select "x64" from the dropdown list.
Click on the "Apply" button to save the changes.
Once you have switched the platform target to x64 bit, you can build and run the project as usual. Make sure to rebuild the project after switching the platform target to ensure that the changes are applied correctly.
In summary, it is important to switch the platform target to x64 bit to execute the project successfully and avoid any errors or issues that may arise due to differences in platform architectures. By following the above steps, you can ensure that the project runs smoothly and without any problems.
If the x64 platform is not available in the platform target list, you can add it manually by following these steps:
Open the project in Visual Studio.
Navigate to the "Solution Explorer" pane.
Right-click on the project name and select "Properties" from the context menu.
In the project properties window, select the "Configuration Manager" button.
In the Configuration Manager window, click on the "Active solution platform" dropdown list and select "New".
In the "New Solution Platform" window, select "x64" as the platform.
Under the "Copy settings from" dropdown list, select "Any CPU".
Check the "Create new project platforms" checkbox and click on the "OK" button.
In the Configuration Manager window, ensure that the "x64" platform is selected for the project.
Click on the "Close" button to save the changes.
Once you have added the x64 platform, you can switch to it in the project properties window and set it as the platform target for the project.
By following the above steps, you can manually add the x64 platform to the platform target list in Visual Studio and set it as the target for your project. This will help you execute the project successfully and avoid any issues or errors related to platform architecture.
Accessing the System: Login Details
Accessing the Complain and Request Management System project requires users to provide login details. The login credentials are essential for ensuring that only authorized users can access the system.
The login details for the project are created during the installation process. Users can customize the login credentials to their liking, including the username and password. It is recommended that users choose strong, unique passwords that are not easy to guess to ensure the security of their data.
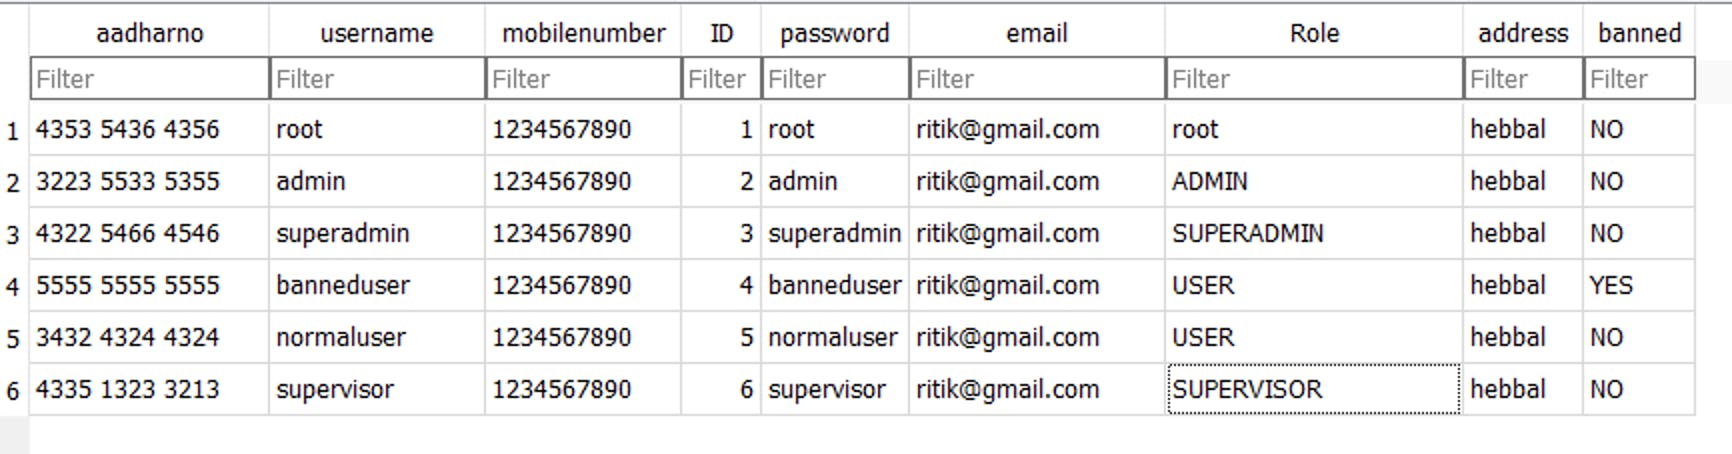
Once users have entered their login credentials, they will be granted access to the Dashboard of their respective roles. The login system ensures that only authorized users can access the system, which is critical for maintaining the confidentiality of sensitive information.
Overall, the login and password details are a crucial component of the Complain and Request Management project. They provide a layer of security that helps protect the system from unauthorized access, ensuring that users can safely store and manage their data.
Conclusion
Congratulations! You have successfully installed and run the Complain Management System project using both C# and VB.NET. This project is a great starting point for any college student looking to create a project that showcases their coding skills. Feel free to customize the project to fit your needs and show off your creativity.
In conclusion, Visual Basic 2022 is a powerful development environment that enables developers to create high-quality Windows applications with ease. With its intuitive interface, advanced debugging tools, and extensive library of pre-built components, Visual Basic 2022 is an excellent choice for developers of all skill levels.
In this blog, we discussed how to run a Visual Basic project in the 2022 version, as well as how to ensure that files such as the "helphub.db" file are copied to the bin folder when building a project.